本文是 Piasy 原创,发表于 https://blog.piasy.com,请阅读原文支持原创 https://blog.piasy.com/2018/04/05/WebRTC-iOS-DataChannel/
今天给大家带来 WebRTC iOS demo 的工作流程分析(P2P 连接过程),以及 DataChannel 的使用示例。最后,我把 WebRTC iOS demo 的代码从 WebRTC 代码库中摘了出来,并使用 CocoaPods 上 Google 发布的预编译库,GitHub 传送门。
另外,从本篇开始,「WebRTC Android 源码导读」系列正式升级为「WebRTC Native 源码导读」 
本文的分析基于 WebRTC 的 #23295 提交。
AppRTCMobile 工作流程
界面入口
点击 Start call
AppRTCMobile/ios/ARDMainViewController.m mainView:didInputRoom:isLoopback
AppRTCMobile/ios/ARDVideoCallViewController.m initForRoom:isLoopback:delegate
server 交互、P2P 连接
AppRTCMobile/ARDAppClient.m connectToRoomWithId:settings:isLoopback,访问 apprtc server 加入房间
创建 RTCPeerConnectionFactory
获取 iceServers 配置 AppRTCMobile/ARDTURNClient.m requestServersWithCompletionHandler
加入房间 AppRTCMobile/ARDAppEngineClient.m joinRoomWithRoomId:isLoopback:completionHandler,和 AppRTC-Android 一样,根据房间号、baseUrl 确定访问 apprtc server 的地址
获取 iceServers 配置成功以及加入房间成功后,都会尝试 startSignalingIfReady
加入房间成功后,会调用 registerWithColliderIfReady 建立长连接
AppRTCMobile/ARDAppClient.m startSignalingIfReady,建立 PeerConnection
创建 RTCPeerConnection 对象
createMediaSenders 里创建 source, track, stream
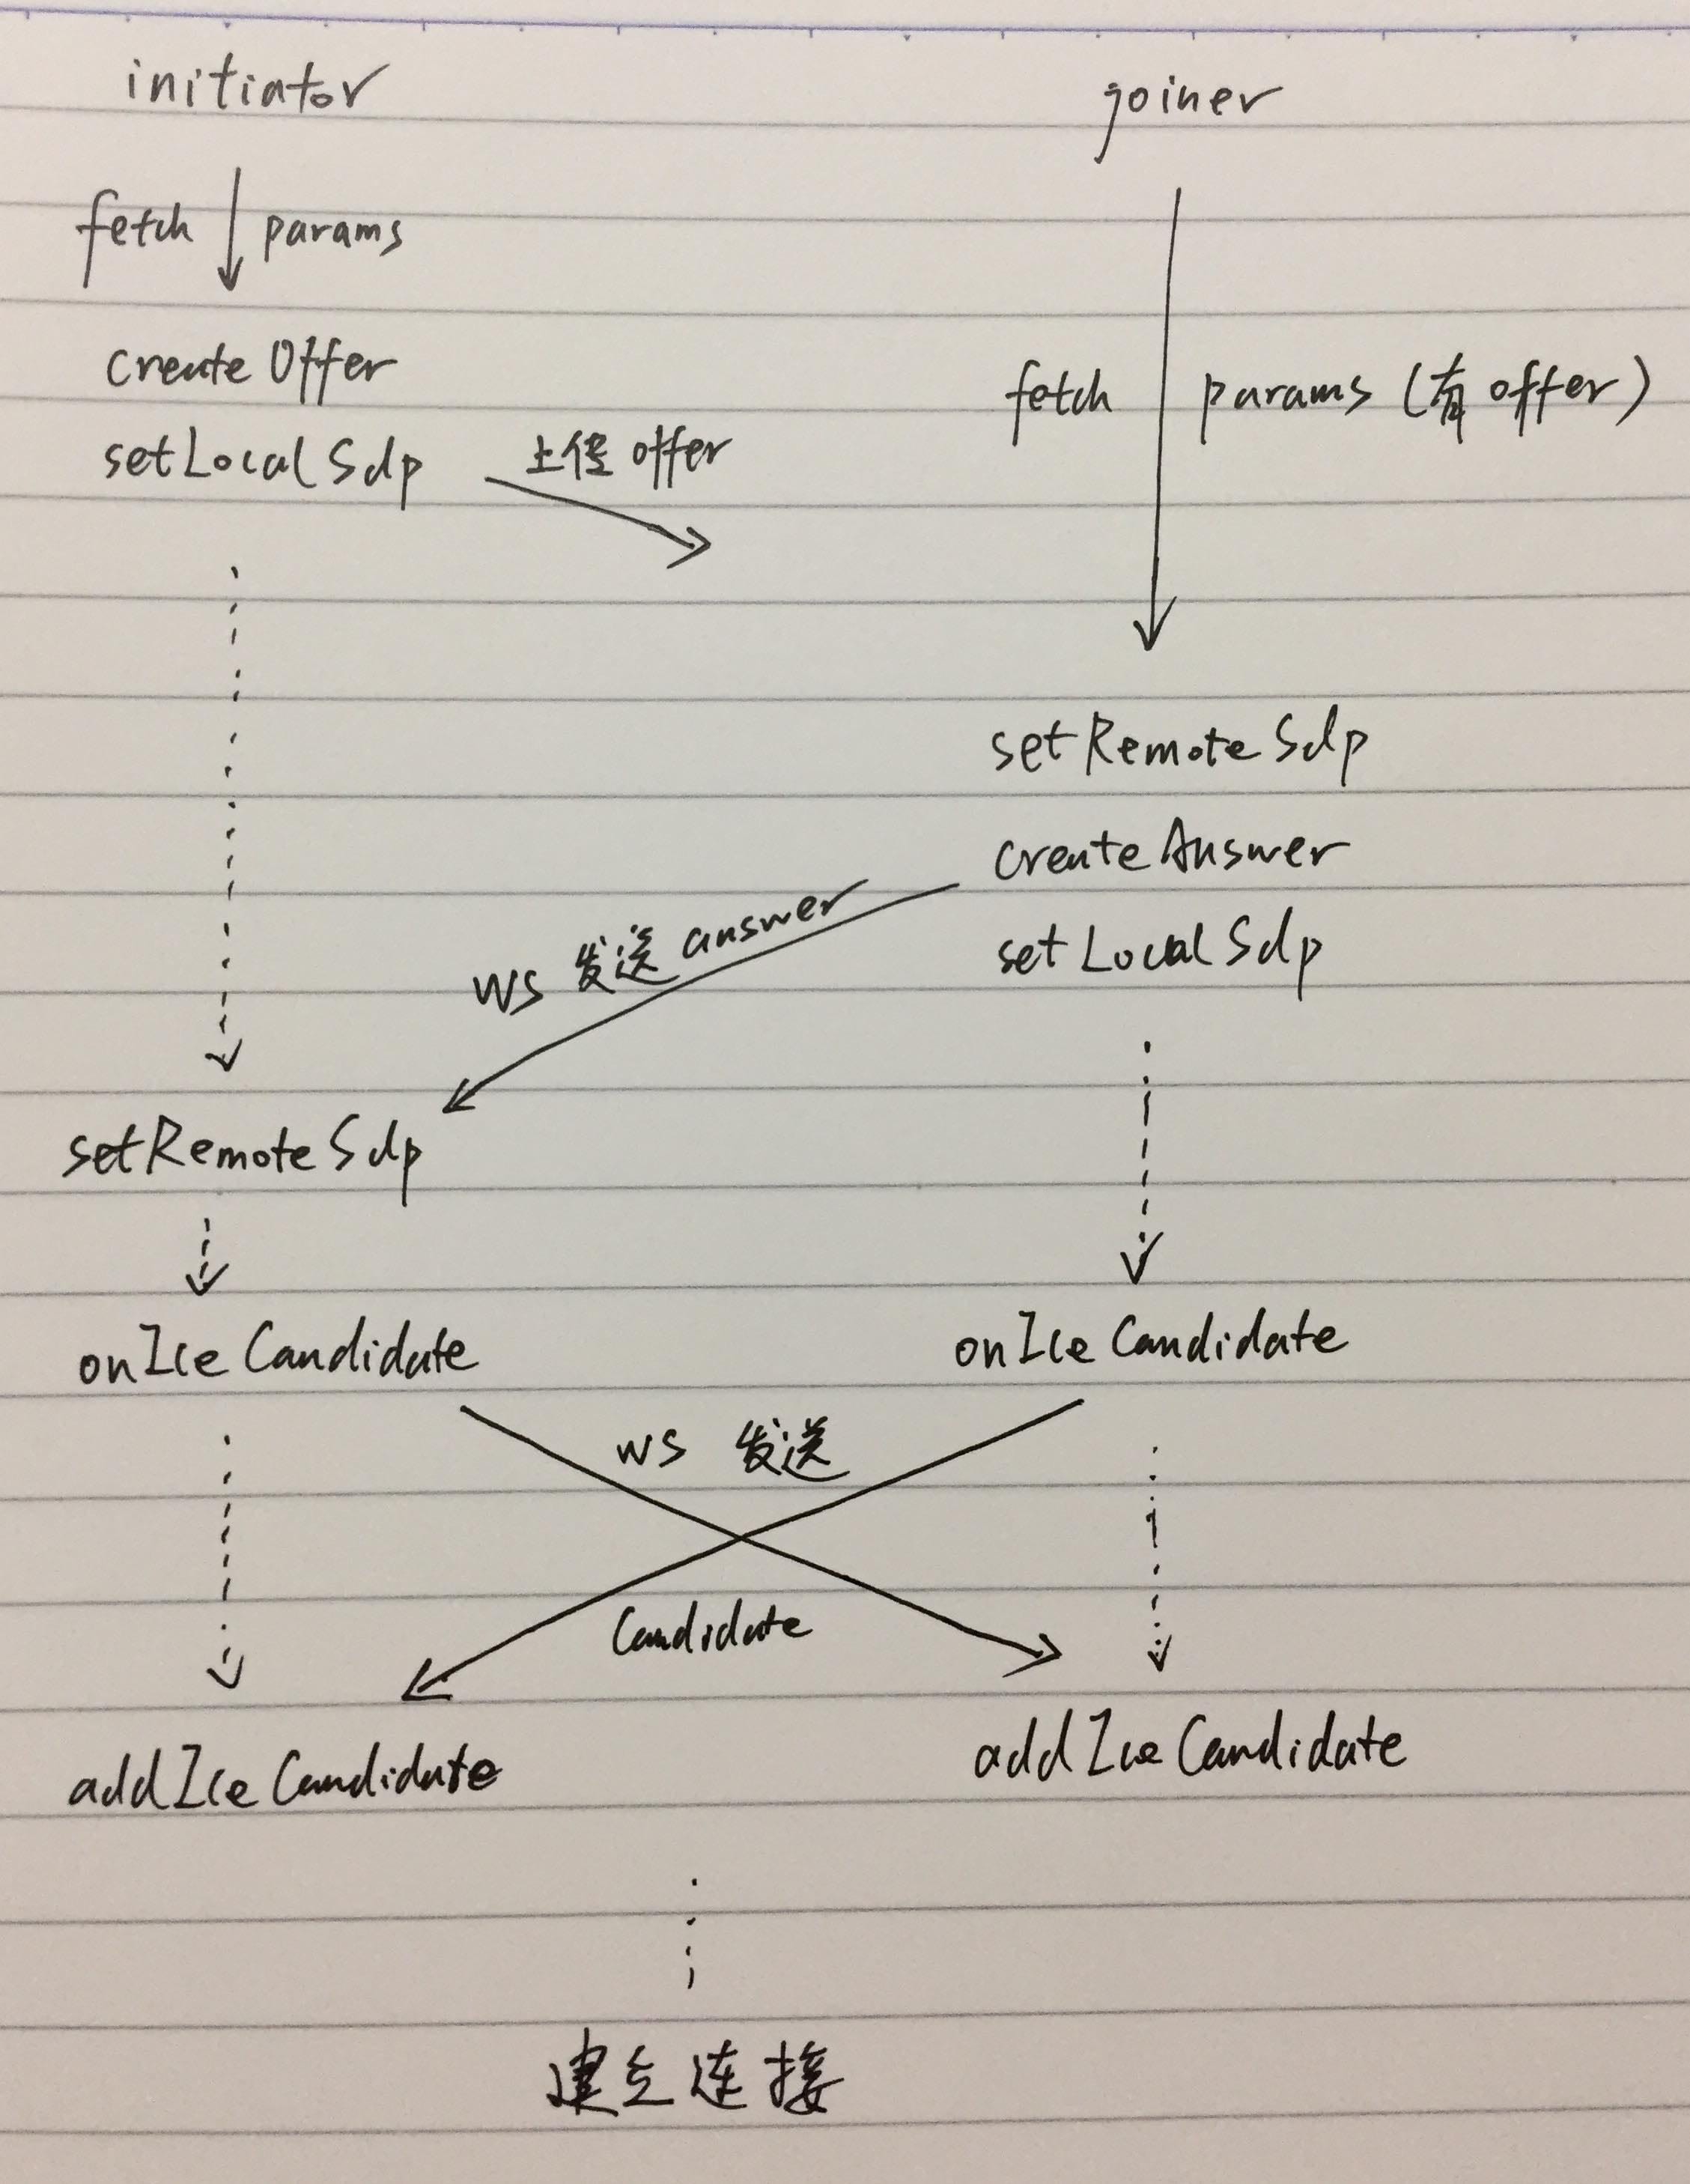
如果是 isInitiator,调用 peerConnection offerForConstraints 创建 offer,调用 peerConnection setLocalDescription 设置 local sdp,调用 self sendSignalingMessage 通过长连接发送 offer
否则调用 drainMessageQueueIfReady 检查是否收到长连接消息,并在 processSignalingMessage 中处理
收到 offer/answer 后调用 peerConnection setRemoteDescription 设置 remote sdp;设置成功后,调用 peerConnection answerForConstraints 创建 answer,设置 local sdp,并通过长连接发送 answer
收到 ice candidate 后调用 peerConnection addIceCandidate 设置 candidate
收到 bye 消息后,退出房间
建立 P2P 连接的流程和安卓基本一致(附安卓流程图):
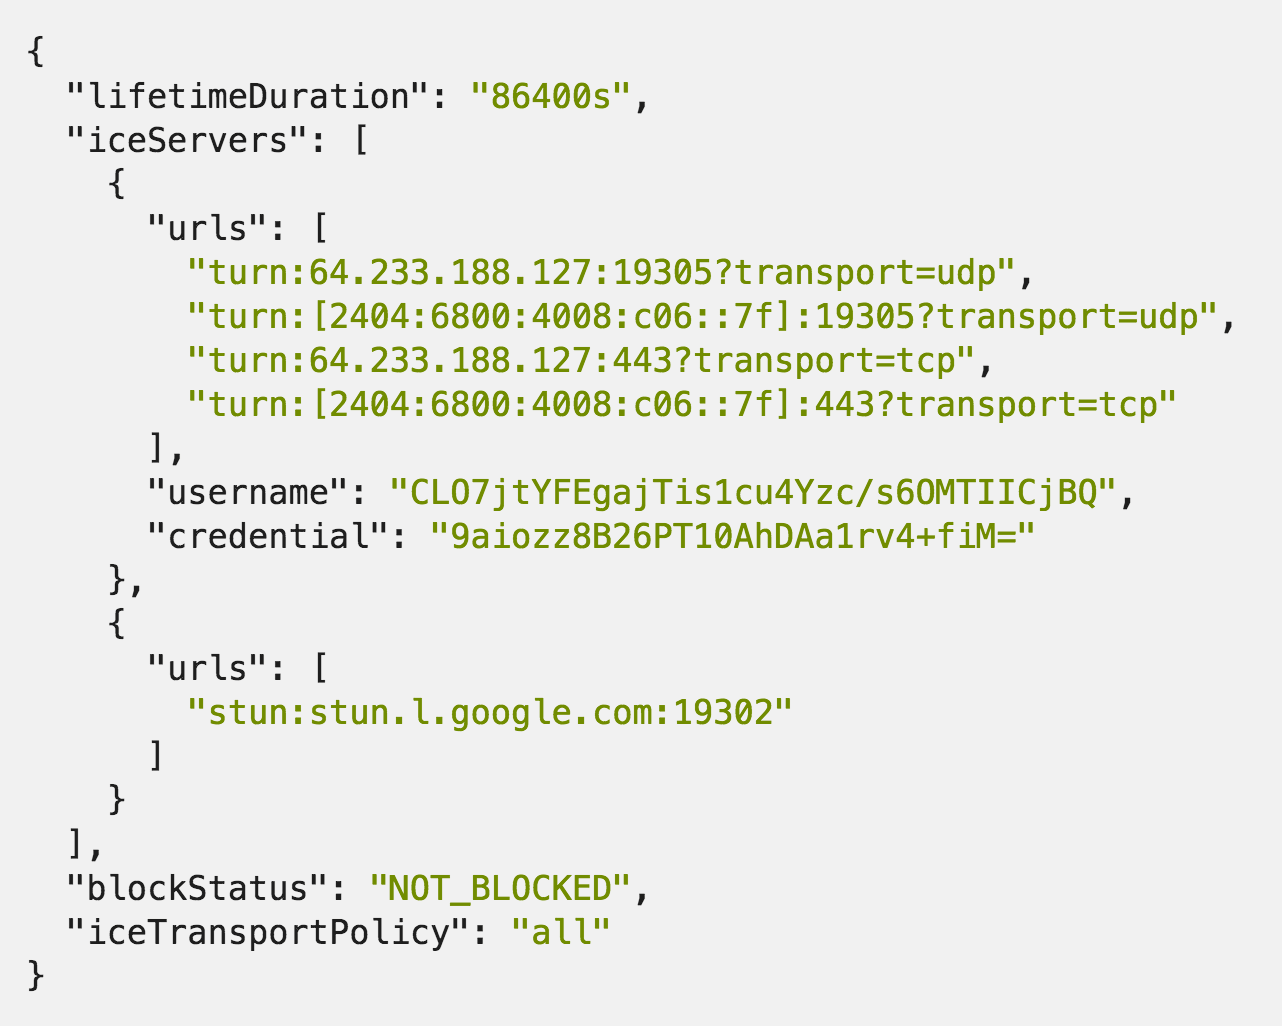
iceServers 配置的获取逻辑等同于下面的两次 HTTP 请求:
curl https://appr.tc/params,取得 ice_server_url,例如 https://networktraversal.googleapis.com/v1alpha/iceconfig?key=AIzaSyAJdh2HkajseEIltlZ3SIXO02Tze9sO3NY;
curl -XPOST -H "referer: https://appr.tc" -d "" https://networktraversal.googleapis.com/v1alpha/iceconfig?key=AIzaSyAJdh2HkajseEIltlZ3SIXO02Tze9sO3NY 取得 iceServers 配置:
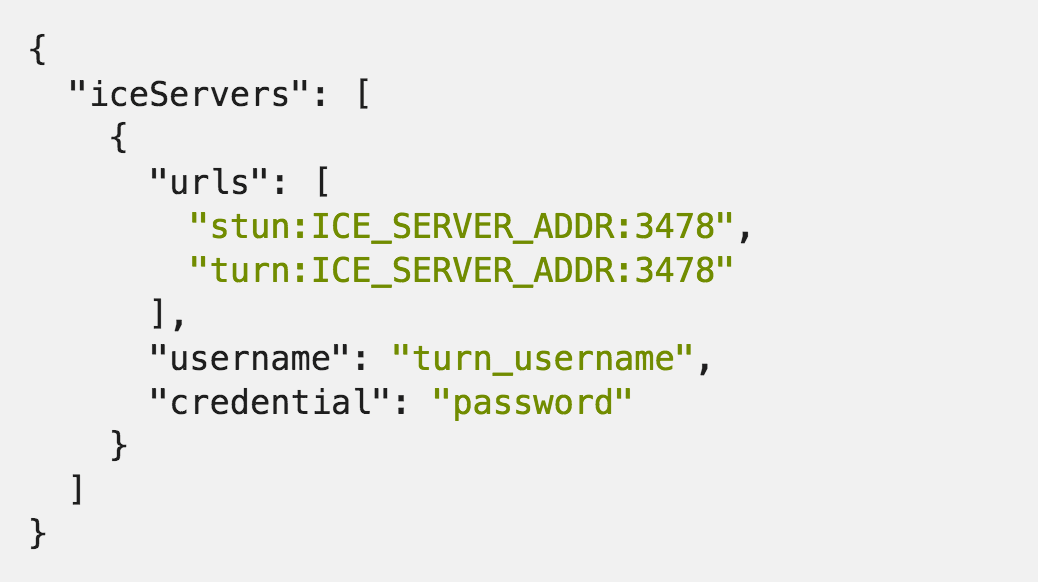
我们在开箱即用的 WebRTC 开发环境中部署的 ICE Server 其实就是直接返回 iceServers 配置的,它返回的数据类似如下:
DataChannel 使用
创建了 RTCPeerConnection 之后(在 ARDAppClient startSignalingIfReady 里),我们就可以创建 DataChannel 了,代码如下:
RTCDataChannelConfiguration* dcConfig = [[RTCDataChannelConfiguration alloc] init];
dcConfig.isOrdered = YES;
dcConfig.isNegotiated = YES; // NO is ok
dcConfig.maxRetransmits = -1;
dcConfig.maxPacketLifeTime = -1;
dcConfig.channelId = 3; // must be set, and >= 0
dataChannel = [peerConnection dataChannelForLabel:@"P2P MSG DC"
configuration:dcConfig];
_dataChannel.delegate = self;
需要注意的是,从 22270~22642 之间的某次提交开始,必须设置 channelId(>= 0),且双方需要设置同一值,否则虽然消息在底层能收到,但会被丢弃掉,上层不会收到回调。
建立好 DataChannel 之后,就可以收发数据了。
(void)sendMessage NSString )message {
RTCDataBuffer buffer = [[RTCDataBuffer alloc]
initWithData:[message dataUsingEncoding:NSUTF8StringEncoding]
isBinary:NO];
[_dataChannel sendData:buffer];
}
处理消息回调:
(void)dataChannelnonnull RTCDataChannel )dataChannel
didReceiveMessageWithBuffernonnull RTCDataBuffer )buffer {
NSString* message = [[NSString alloc] initWithData:buffer.data
encoding:NSUTF8StringEncoding]
}
PS: 目前我对 iOS UI 编程尚不熟悉,所以 DataChannel 的使用没有 UI,代码在 dc_text_chat 分支。

